

Is There A Way To Upload A Csv File On A Website
Want to let CSV uploads in WordPress?
Letting your visitors attach CSV files to forms can help yous to easily take information stored in tables.
In this article, we'll show you how to hands create a CSV upload form in WordPress.
Click Here to Create a CSV Upload Form Now
Hither'southward a tabular array of contents so you tin can easily observe each section:
- Create Your CSV Upload Course in WordPress
- Switch to the Classic Way File Upload Field (Optional)
- Configure Your CSV Upload Grade Settings
- Customize Your CSV Upload Form'due south Notifications
- Configure Your CSV Upload Form'southward Confirmations
- Add together Your CSV Upload Form to Your Website
- View the Files
Why Use a CSV Upload Field on Your WordPress Forms?
CSV stands for comma-separated value. It's basically but a plain text file that has a bunch of data inside of it. These kinds of files store information in tables.
WPForms is the best WordPress Form Builder plugin. Become it for complimentary!
And then they pretty much exist to make it easier to ship that information from one app to another.
For case, hither are some real-life reasons you may want to permit visitors upload a CSV file:
- Y'all're gathering timesheets for employees working on a personal improvement plan
- To collect nutrition diaries for customers on health or wellbeing plans
- Y'all want to store Inventory details for an equipment checkout course
- To get together financial information for a mortgage awarding
- To collect bulk purchases for a wholesale order form
- To get payments with your file uploads
- You lot want to create an RSVP grade in WordPress and allow your visitors upload attachments.
You lot can probably think of a bunch more.
Information technology's really easy to allow CSV uploads in WordPress. Yous can collect data in CSV files from any folio on your website.
WordPress blocks some file types for security reasons. But most image files can be uploaded using WPForms, and CSV files are allowed by default. If you accept issues with other file types, read our guide on how to allow boosted file upload types.
Permit's create our first CSV upload form.
How to Create a CSV Upload Form in WordPress
In this article, we'll use the WPForms plugin to quickly create a class that volition allow CSV file uploads in WordPress.
We've broken it downwardly into 7 steps.
Step 1: Create Your CSV Upload Grade in WordPress
To create your CSV upload form, yous'll demand to install the WPForms plugin.
WPForms is the best file upload plugin for WordPress. It makes it really easy to create a form for whatever purpose using a elevate and drop builder.
Once you lot've created your CSV upload form, you tin brandish it anywhere on your site. You lot can even place it in the sidebar.
If you demand a footling help getting the WPForms plugin installed, see this footstep-past-step guide on how to install a plugin in WordPress.
In one case y'all take WPForms installed, actuate the plugin. You lot'll run into WPForms in the left-hand navigation menu in the WordPress dashboard.
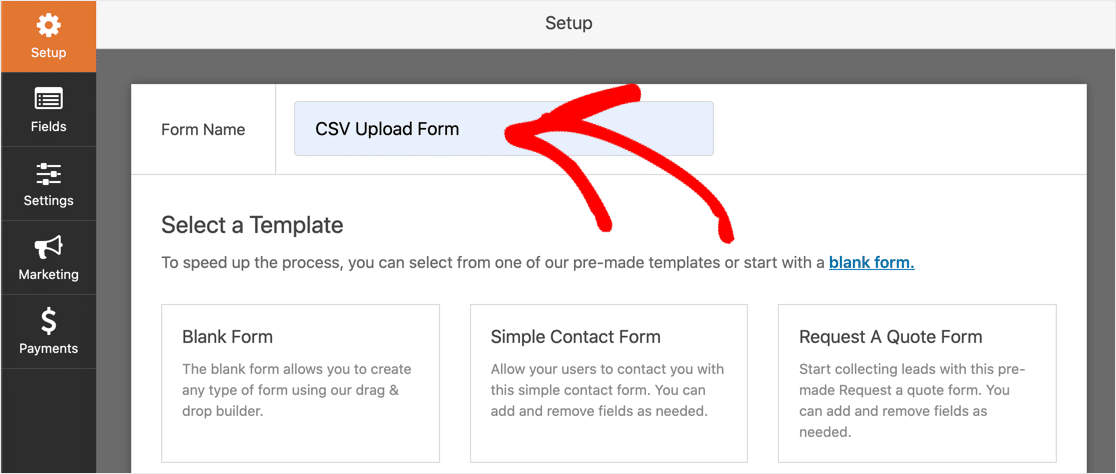
Click WPForms » Add together New to create a new class. Type a name for your form at the peak.
Let's start with a template and then customize it to allow CSV uploads.
In WPForms, coil down to the Additional Templates section. Search for "File Upload Form" and click on information technology.
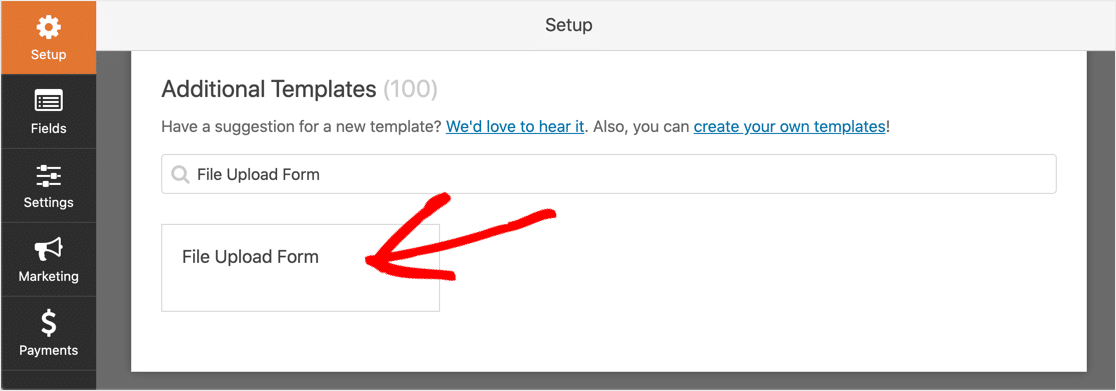
If you don't see the File Upload Grade, you might need to activate the Form Templates Pack Addon.
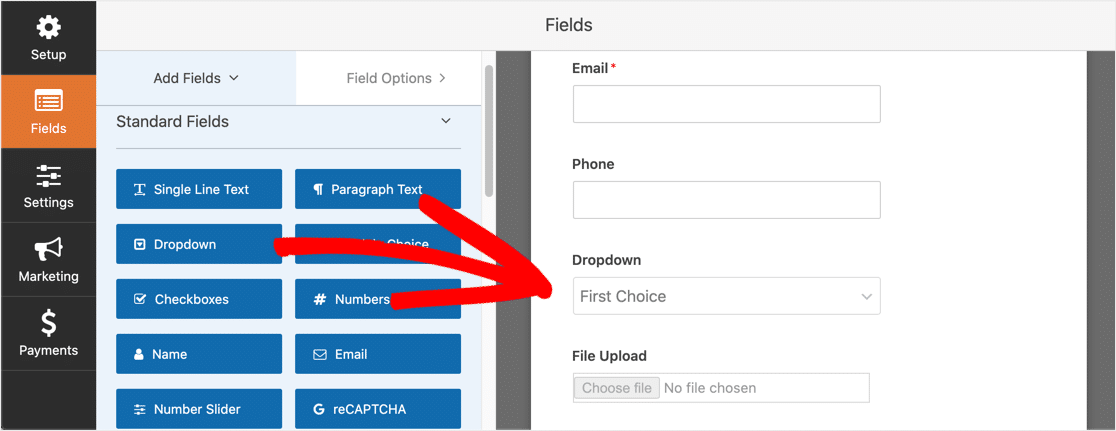
WPForms will create a blank form with 4 fields: Name, Email, Phone, and File Upload.

To add more fields to the form, drag and drop the field you want to add together from the left-manus panel to the right-hand panel.
You lot can also change the club of the fields. Click on the field you want to move and elevate it up or downwardly.
Exercise you already have a grade that you want to use for CSV uploads? Y'all tin hands add the File Upload field to it. Open the grade in the WPForms editor, expand the Fancy Fields drop-down, and drag a File Upload field from the left-paw panel to the right-hand panel.
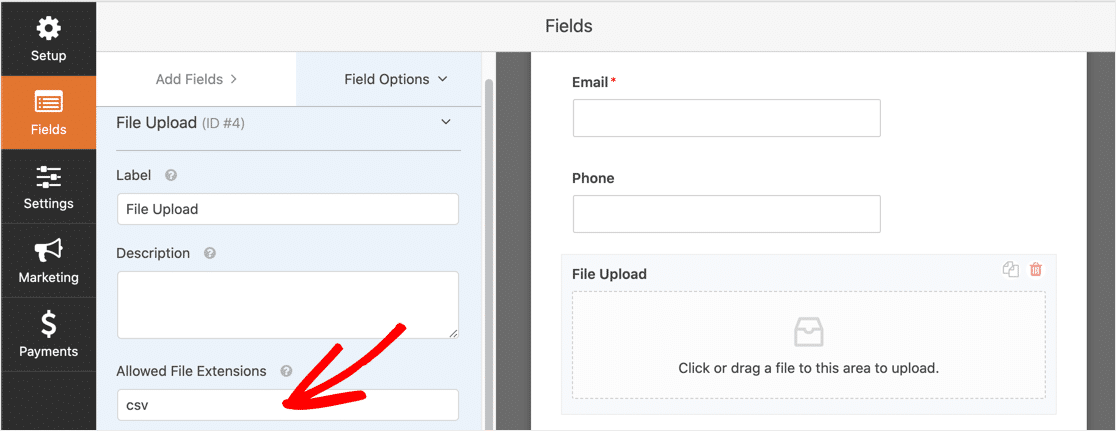
Now you have a file upload field on your form. Past default, it will allow many different file types to be uploaded.
To only allow CSV files to exist uploaded, click on the File Upload field. In the Allowed File Extensions field, type csv.
Sometimes applications salve CSV files in a unlike format. To make things easier for your visitors, yous may want to permit those formats too.
For example, to allow Excel formatted files and CSV files to be uploaded, yous would type csv,xls,xlsx in thePermit File Extensions field.
You tin can alter other options to command the file upload field:
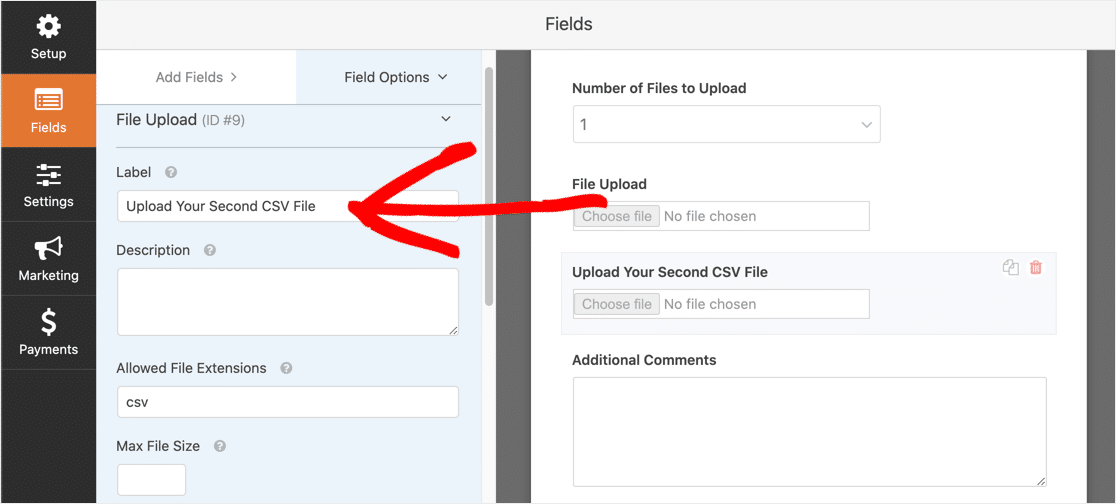
- Label — Give the Form Upload field a label like Upload Your CSV File so your visitors know what the field is for.
- Description — Add a description. For example, you might want to specify which file extensions your visitors tin can upload.
- Max File Size — Specify the maximum size of the CSV file users can upload. If you don't specify a number here, WPForms will default to the maximum file size that your server allows. If yous need to change this, run into this tutorial on how to increase the maximum file upload size in in WordPress.
- Required — If this is checked, your visitor must attach a CSV file before they tin can submit the grade.
- Style — You can cull the Modern style file uploader (recommended) or the Classic fashion (which we'll explicate in Step 2, beneath).
Then, once your user submits a form, what happens next?
By default, WPForms will relieve CSV files into a binder called WPForms in the WordPress Uploads directory. You tin access the files past connecting to your web host via FTP.
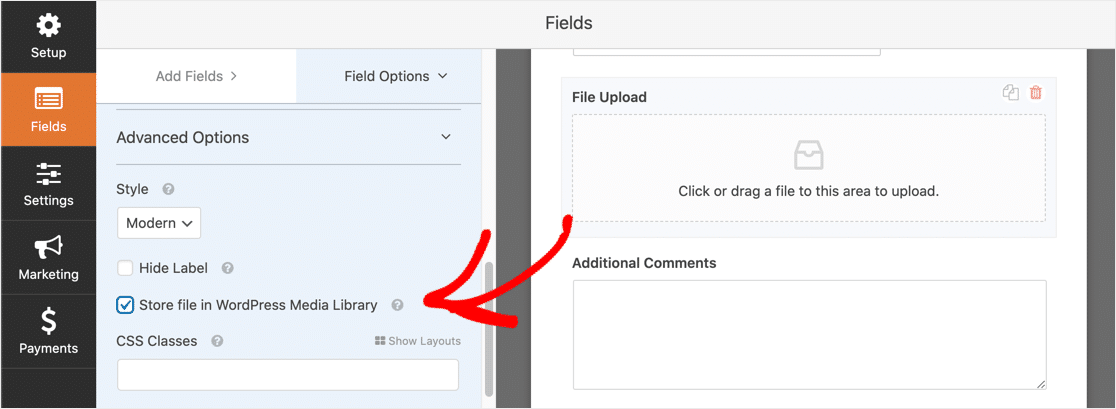
Information technology's a lot easier to have WPForms save the files into your WordPress Media Library so you tin access them right from the WordPress dashboard.
To practice this, click on your File Upload field. Aggrandize the Advanced Options drib-downwards and check Store file in WordPress Media Library.
We're done creating our simple upload form!
If you have a complicated course, you can brand it easier to navigate by following our tutorial on how to create a multi-footstep course in WordPress.
Step 2: Switch to the Classic Fashion File Upload Field (Optional)
The Modern file upload manner is great for all forms. Information technology lets users drag as many files as they desire onto your Form Upload field.
But there are 2 reasons you may need to switch to the Archetype style instead of the Modern style:
- Yous (or your visitors) adopt to click a 'Choose Now' button to select their CSV file
- You lot want the File Upload field to be smaller in size.
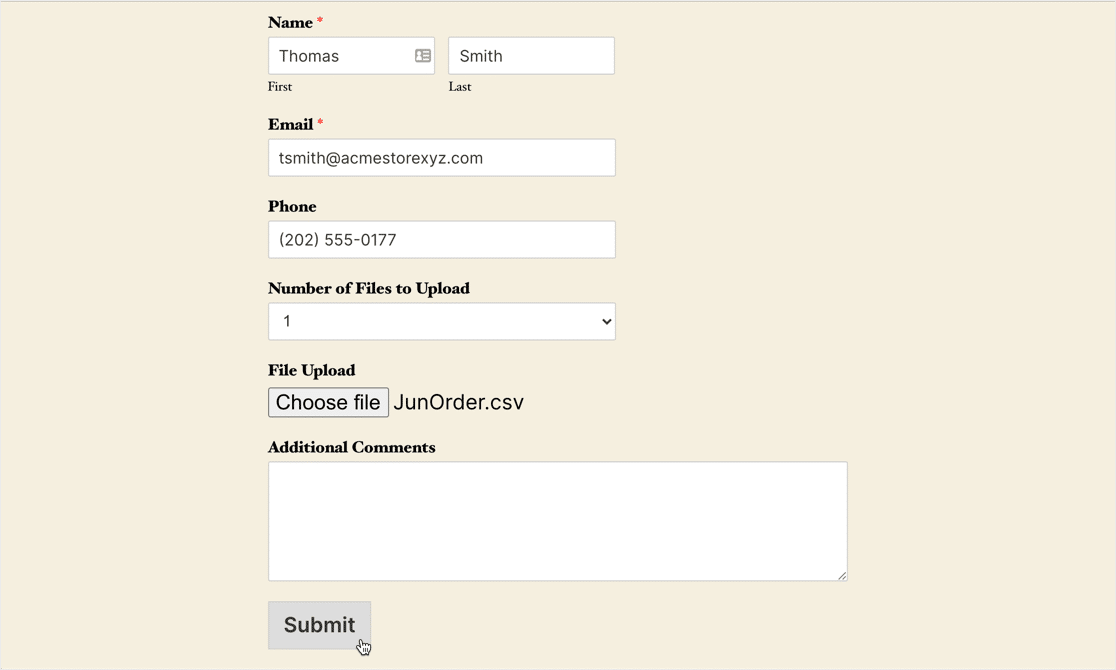
If you'd like to switch to the Classic fashion, you tin can do that by clicking on the File Upload field and selecting Classic the Manner drop-down list.
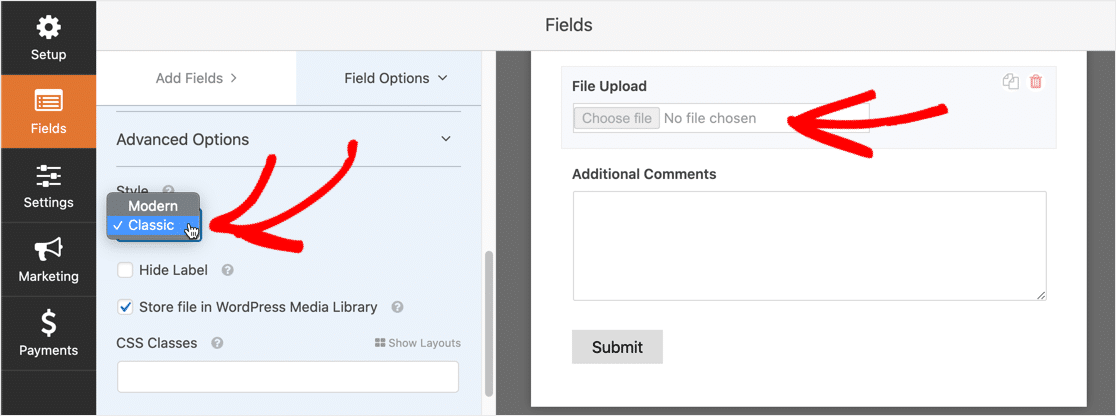
Keep in mind that the Classic style upload field simply accepts ane file.
If you lot want to utilize the Archetype field for multiple file uploads, you lot can enable conditional logic. This lets you add together multiple File Upload fields. The actress fields will simply testify upwardly if your user needs them.
That helps to continue the form compact.
If you don't demand to let users upload multiple CSV files, you can skip the residuum of this department.
We need to kickoff ask the visitor how many files they want to upload, then display the respective number of Classic File Upload fields.
Nosotros'll create iii fields in this example, just you tin can brandish as many as you want.
To begin, drag a drop-down list field onto your form. Identify it above the File Upload field.
Click on the drop-downwardly list field to alter the settings. Permit'south change the Label to 'Number of CSV Files to Upload'. Nether Choices, add together iii driblet-downwards list items: i, ii, and 3.

Side by side, click the File Upload field. Curl down to the Conditionals section and expand it. And then check the Enable conditional logic box.
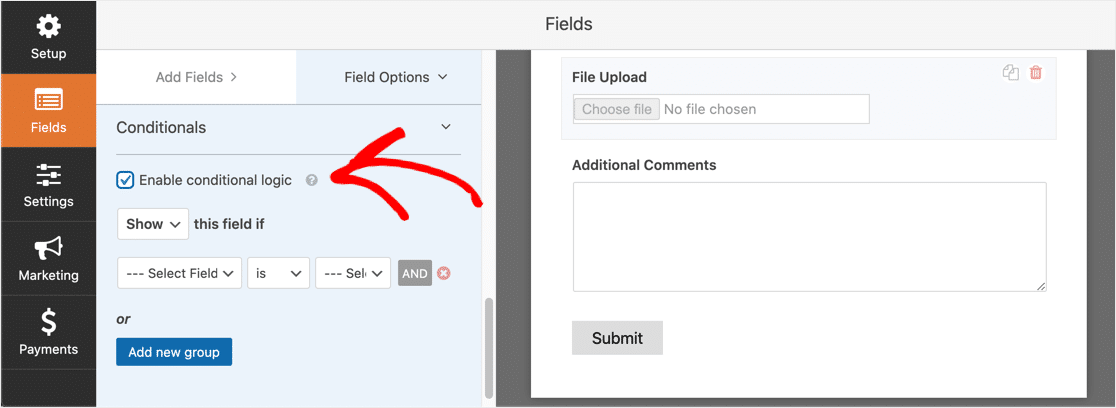
Now you need to create the provisional logic for the field. Just friction match yours to the screenshot below:
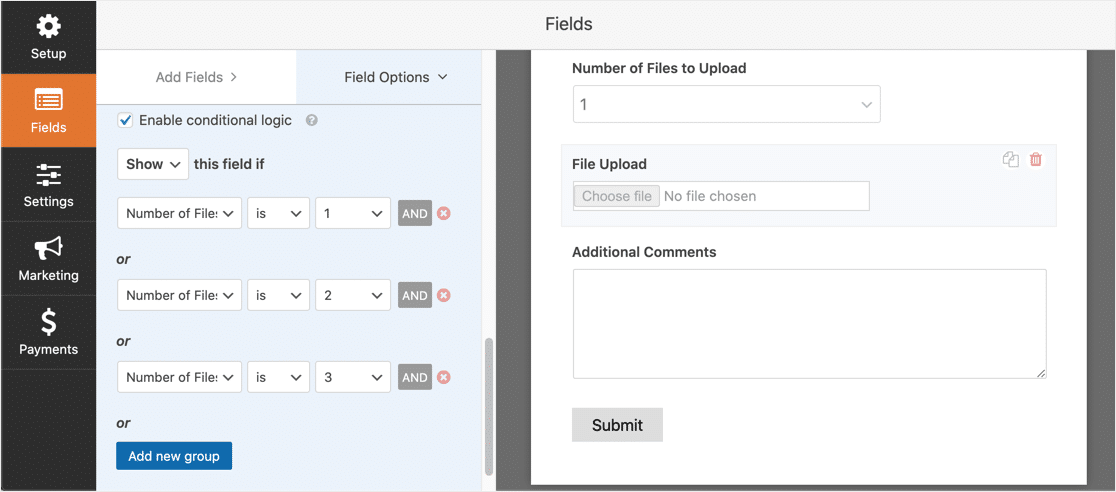
Exist sure to add the fields using the Add new group button and then that your course uses OR logic. If you need more than data virtually AND and OR logic, read our guide on how to use AND/ OR logic in WPForms.
Now we'll add the second File Upload field. Click the duplicate icon on the right-hand side of the Class Upload field to create a copy of it.
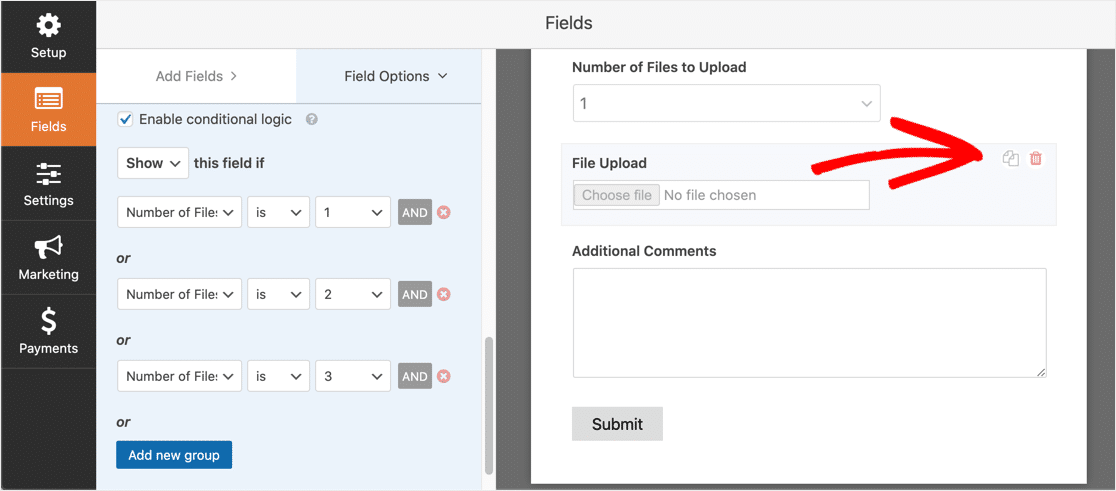
Click on the second File Upload field and change the Label to 'Upload Your 2d CSV File'.
Set up the conditional logic for this field equally in the screenshot beneath. We removed the showtime action, Number of Files to Upload is 1. The other 2 actions are the same.
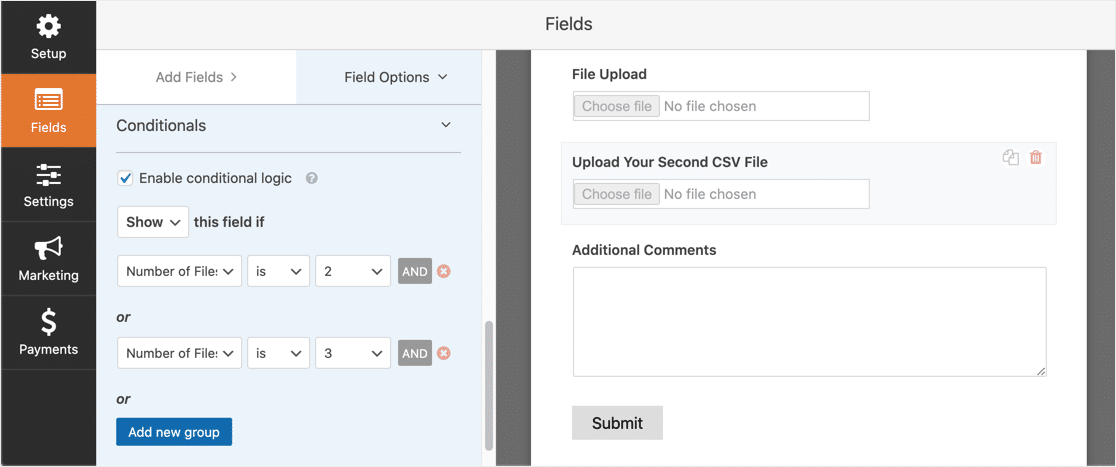
Now, the second field volition prove upwardly if the user selects ii or iii in the driblet-down list.
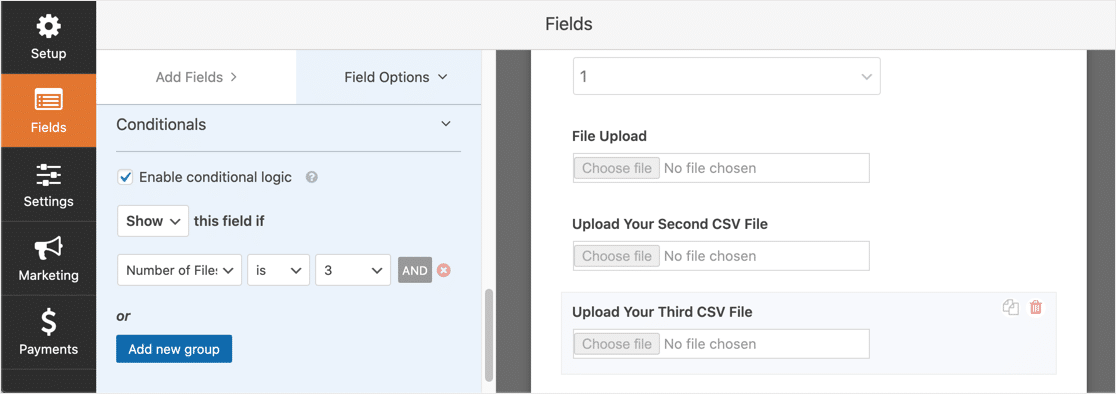
Next, duplicate the second File Upload field to create a third one. This time, characterization it Upload Your Third CSV File.
Here's what the logic for the 3rd field looks like. This time, nosotros removed the Number of Files is 2 activity.
And that'southward information technology. Easy, right?
Click Salvage at the peak-right of the WPForms screen to save your form.
Then it's much easier to use the Mod style if you want to accept multiple CSV uploads. But now yous know how to use the Classic mode to allow CSV file uploads in WordPress when your company has more than than one file.
Now we can configure the settings for the form.
Step three: Configure Your CSV Upload Grade Settings
Click Settings » General to open your class settings.
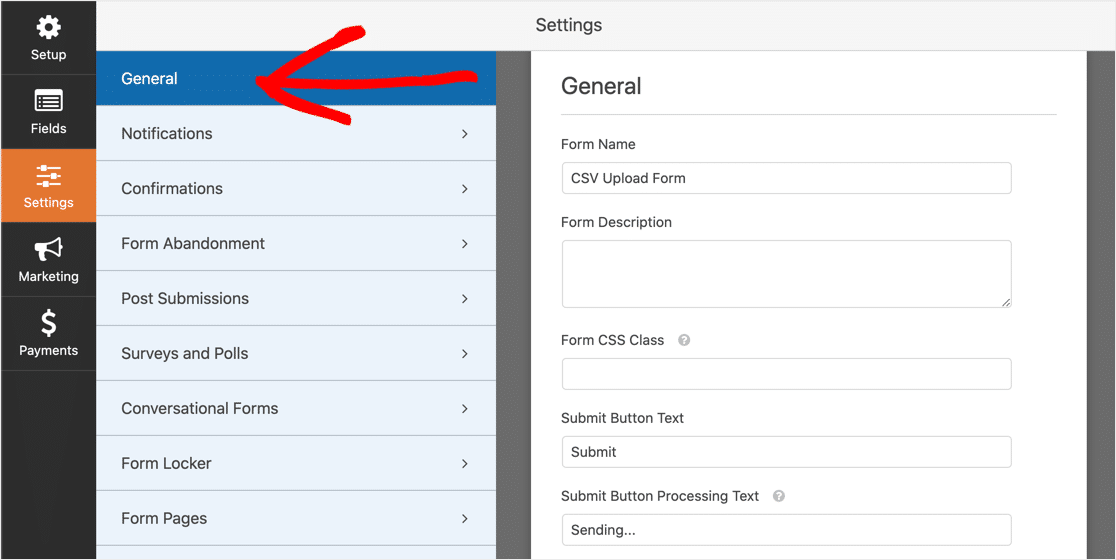
In this section, you can configure the following options:
- Form Proper noun — Edit the name of your form.
- Form Description — Add a clarification for your form. You lot can choose to brandish the clarification above the form when you embed it on your site.
- Submit Push Text — Customize the wording on the Submit button.
- Spam Prevention — Stop spammers from submitting junk entries through your contact form. You can use the anti-spam feature, custom CAPTCHA, hCaptcha, or Google reCAPTCHA. Keep in heed that the anti-spam feature is enabled on all new forms past default.
- AJAX Forms — Enable AJAX settings so the class can exist submitted without reloading the folio.
- GDPR Enhancements — Brand your course GDPR compliant. This will reduce the amount of data that the form captures about your visitors. If your form is likely to be used past people who live in the Eu, you might need to bank check this. For more details, meet our guide on how to add together a GDPR Agreement Field to your site's forms.
Click Save when you're done.
Step 4: Customize Your CSV Upload Grade's Notifications
Yous can choose how you lot'd like to be notified when someone submits your form.
Past default, every class has email notifications switched on. Yous tin can customize the email notification, or plough it off, in the Settings » Notifications panel.

If you lot need help getting these notification emails gear up, yous can read our guide on setting up grade notifications in WordPress.
You can also send a notification to your visitor automatically when they submit a form. This is a nifty mode to allow them know that you received their file. To set this up, yous'll demand to use smart tags in your notification template.
You lot could also send the CSV file to other departments in your company. For example, you could take all of your wholesale orders go to the fulfillment center.
To send multiple notifications, read our guide on sending multiple form notifications in WordPress.
If you'd like to brand your emails, WPForms tin can add an paradigm or company logo to notification emails as a custom header paradigm. Your logo volition show up at the top of the e-mail, like in the screenshot below.

It's of import to notation that WPForms doesn't include file uploads every bit attachments when it sends out notifications. That'due south considering most electronic mail providers limit the size of attachments, and then your notifications might fail.
Instead, WPForms provides a link to the file in the notification electronic mail. But click the link to view or download the file.

Stride 5: Configure Your CSV Upload Form Confirmations
Confirmations are actions that automatically happen when a form is submitted. If y'all need more aid with this, read our tutorial on how to set up form Confirmations.
You tin cull between three unlike types of Confirmations:
- Message — Displays a message to confirm that the class has been submitted. This is the default Confirmation for every form. You can customize it if you want to.
- Brandish Folio — Automatically displays a page or post on your site when the form is submitted.
- Redirect — Automatically loads a page on another website.
For our CSV upload form, let's display a simple confirmation message.
Head back to the class editor and open your course. Click Settings » Confirmation.
In the Confirmation Blazon drop-down, select Message.
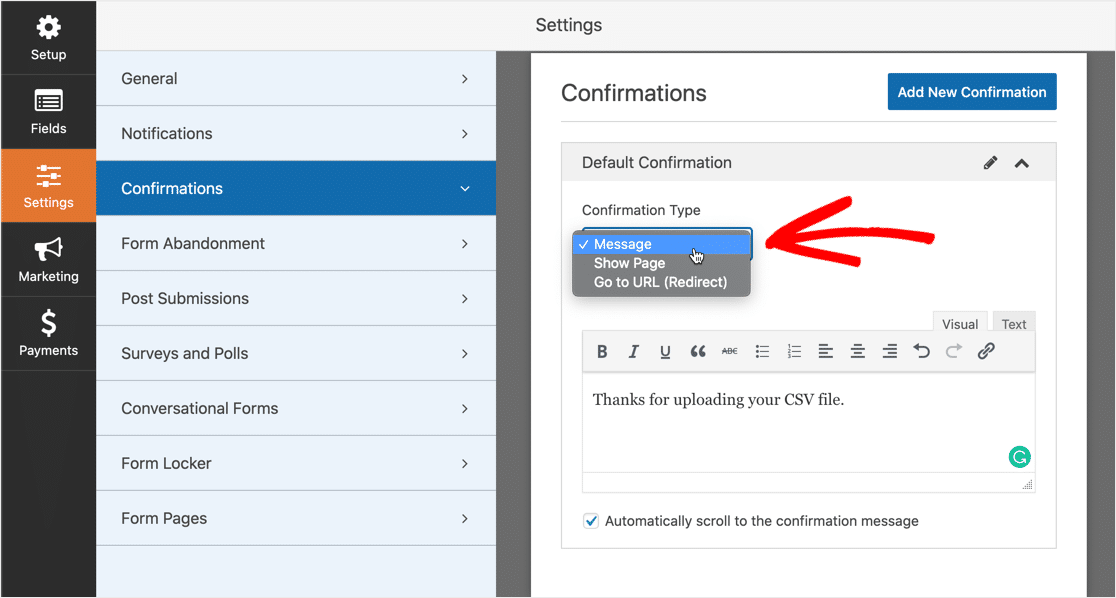
Create the message and click Save.
All done! Everything'southward complete, except for one important step. Allow'south put the CSV upload form onto your website.
Footstep 6: Add together Your CSV Upload Course to Your Website
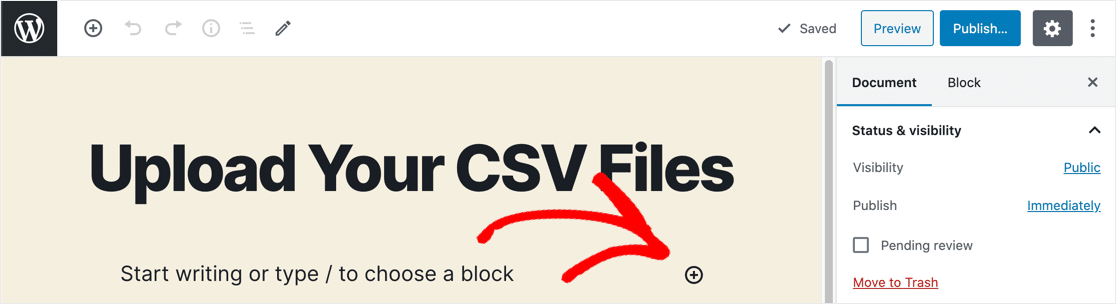
WPForms lets you add forms anywhere in WordPress: a page, a postal service, or in the sidebar. Nosotros're going to add together it to a new page in this example.
Create a new page. In the Block Editor, click the plus icon.
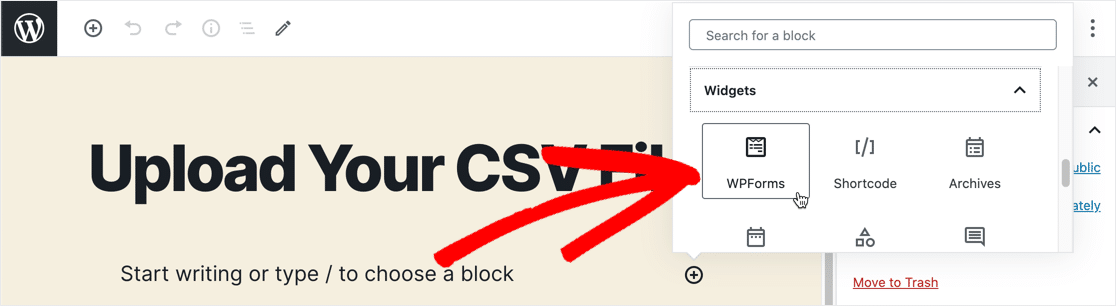
In the carte that appears, scroll down to Widgets, and so click WPForms.
The WPForms widget will load in the Block editor. In the drop-down list, select the CSV upload form.
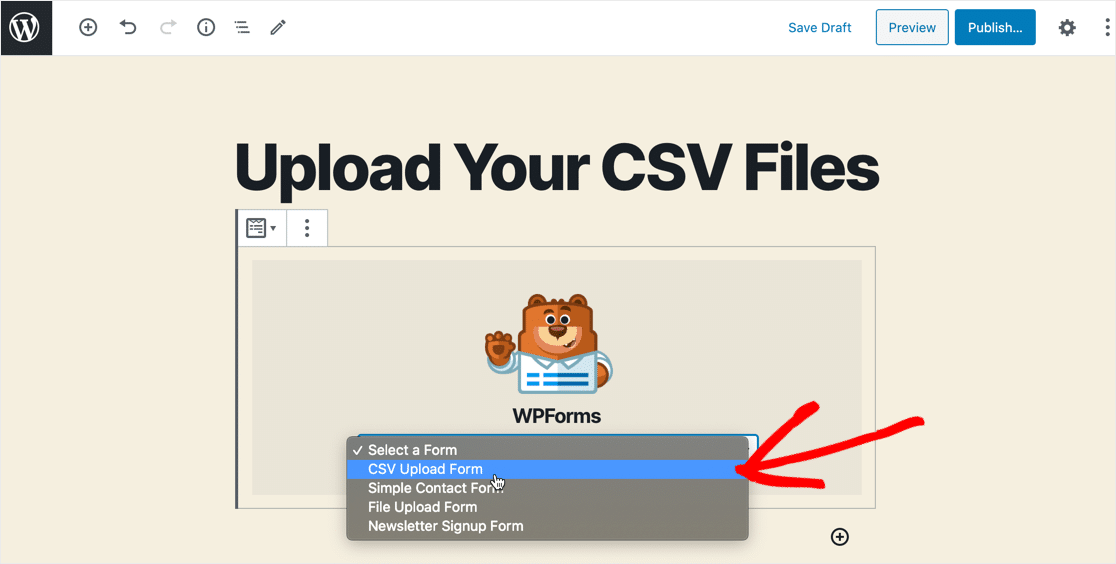
Next, click the bluish Publish or Update push at the summit-right corner.

You're all washed! Your new CSV upload file is now live on your website and set for your visitors to upload their files.
Footstep 7: View the CSV Files
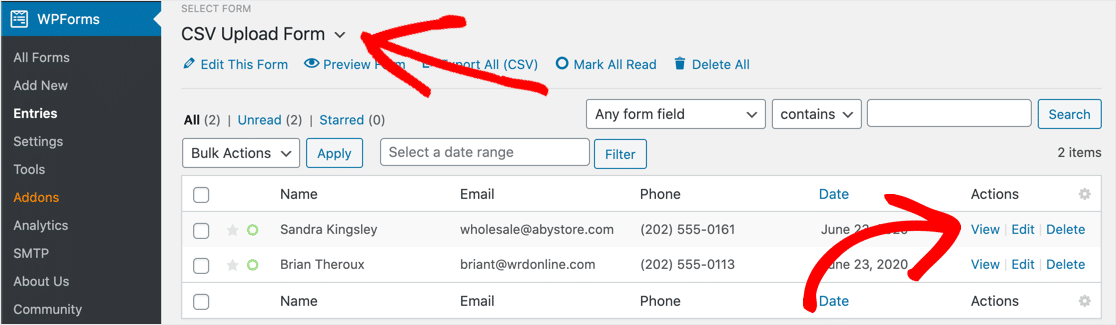
Yous tin can view all of the form submissions y'all've received in the WordPress dashboard. Click on WPForms » Entries, then employ the drop-downwards list at the top-left to view the entries for the CSV upload course.
To view each individual form submission, click the View link on the right-hand side of the row.
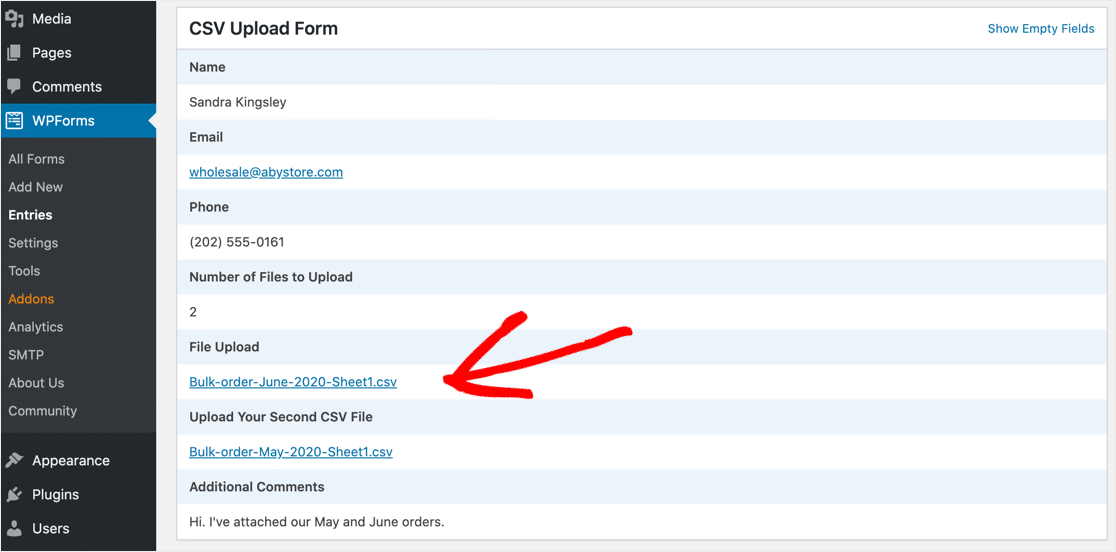
Y'all can save or open the files the user uploaded by clicking the link.
If you demand to store uploaded files in Dropbox or Google Drive, you can utilize the Zapier addon to do that automatically.
Click Here to Create a CSV Upload Form Now
Concluding Thoughts on Allowing WordPress CSV Uploads
That'southward it! Now you know how to allow CSV file uploads in WordPress.
If you'd like to create a sidebar widget for your CSV upload forms, check out how to create a file upload widget in WordPress.
Did you know that you lot can too export WordPress class entries in CSV format? It's a great manner to view your contact grade entries in Excel.
Prepare to build your CSV upload form? Get started today with the easiest WordPress grade builder plugin. WPForms Pro includes a gratuitous file upload class and offers a fourteen-day money-back guarantee.
If this article helped you out, please follow u.s.a. on Facebook and Twitter for more than free WordPress tutorials and guides.
Source: https://wpforms.com/allow-csv-file-uploads-wordpress/
Posted by: dukespring1995.blogspot.com
0 Response to "Is There A Way To Upload A Csv File On A Website"
Post a Comment